As described in the Break Clearing Phase Sub-streams section, during the two-stage market data exception management workflow (MD XM), the phases which may need your input are:
- the ‘Preliminary Breaks’ clearing phase
- the ‘Overlay Breaks’ clearing phase
Each break clearing phase will be split into sub-streams according to the task granularity settings, with the ‘Overlay Breaks’ clearing phase split first by curve configuration.
If there is no break identified following a break test calculation within a given sub-stream, its status will directly be set to ‘APPROVED’. Otherwise, a break clearing task will be generated accordingly, starting with a resolution task.
On this page, we will provide:
- an overview of the resolution process for market data break clearing
- a description of the resolution actions for preliminary and overlay breaks
- a description of the display configuration that you can apply to break clearing tasks
The resolution process will be followed by the approval process where a different user will either approve or reject the proposed resolutions.
Once breaks are resolved and approved, you can view and export the results of the exception management process, including raw, preliminary cleansed and overlay cleansed data (as described below), with the triggered breaks and corresponding resolution applied where applicable.
Overview
If, following a break test calculation, there are breaks to be cleared within a given sub-stream, you will need to:
- check out the relevant resolution task
- at the task level, apply a (collective) resolution action on selected MDKs with break(s) (as described below) and submit it for approval
- in case of rejection, repeat the resolution process for the rejected MDKs
Given the nature of the two-stage MD XM workflow, you will not be able to approve your own proposed resolutions.
At the task level, the resolution process will be as follows:
- for each MDK with break(s), you can
APPLY a chosen resolution action either collectively (i.e. on all or on a sub-selection of filtered or explicitly selected items) or individually (1) - applied resolution for selected items can be undone by clicking on
RESET - you can submit applied resolutions for approval “as-you-go” (i.e. on the subset of MDKs for which you have applied a resolution action) by clicking on
SUBMIT or CTRL+ENTER / CMD+ENTER on your keyboard (2) - a resolution task can be cancelled as a whole at any point by clicking on
CANCEL (3)
You can configure the display within a task with your preferred settings.
Resolution Task for Market Data Breaks
In this section, we will illustrate with a worked example how to:
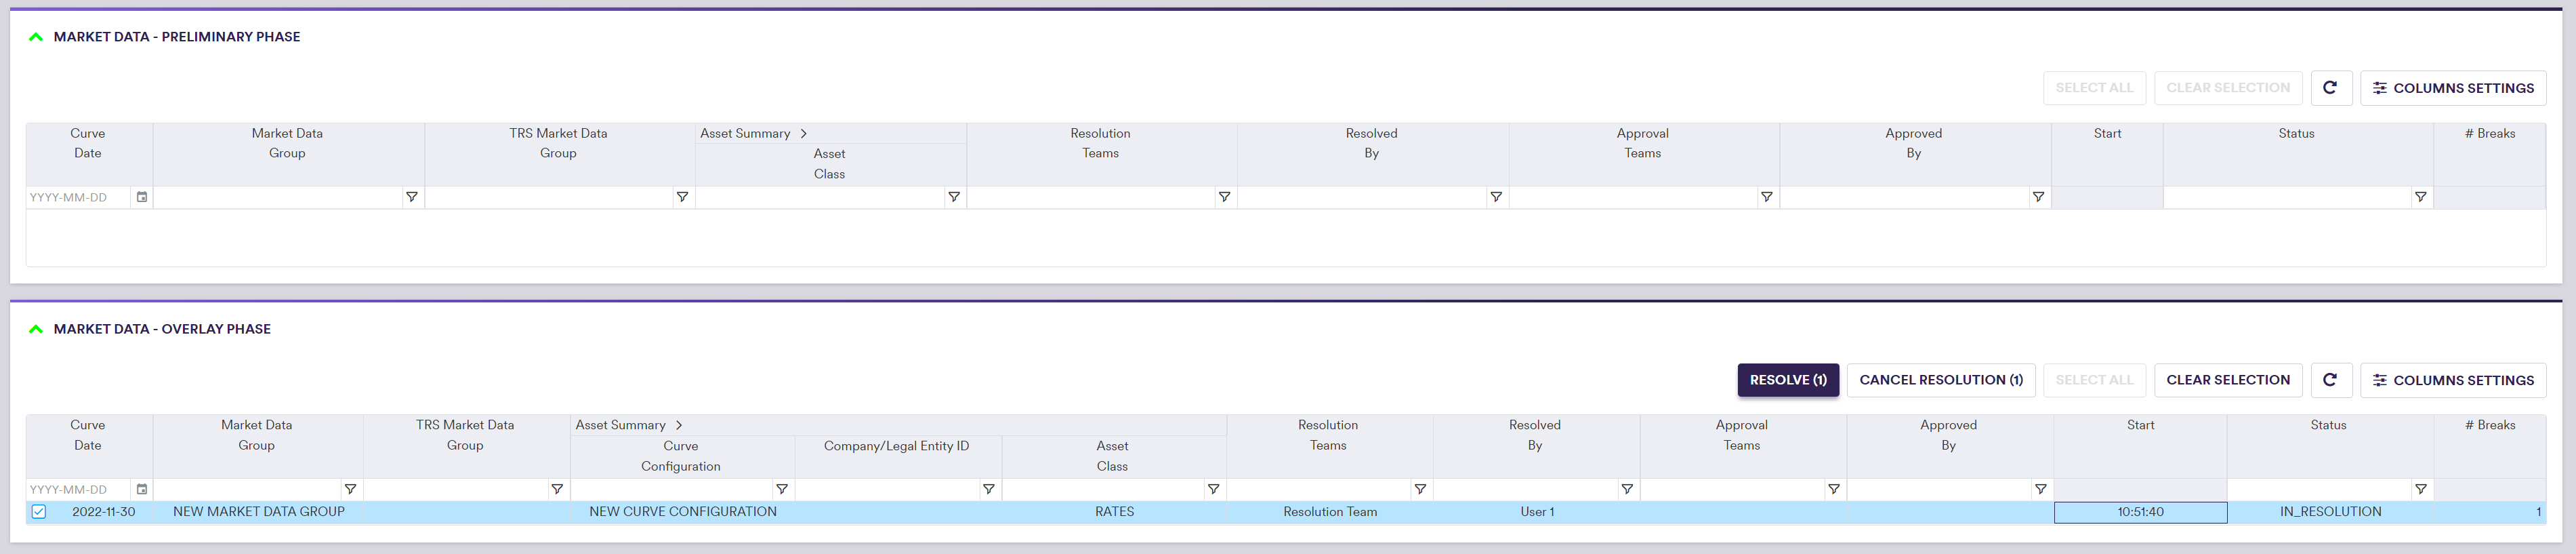
1. Market Data Preliminary Breaks
In our example, we have a preliminary market data break (Quantum test) that you will resolve with the individual ‘Manual’ override action, which will then need to be approved by a different user. This will be followed by an overlay break (EUR IRS Source to Source test) that you will resolve with the overall ‘Keep’ action, which will then need to be approved by a different user.
Additional dropdowns and/or entry fields may appear according to the chosen resolution scope or action (as described below).
Under

To start the resolution process, check out a task by double-clicking on the line item or selecting a series of tasks and clicking on

After clicking on
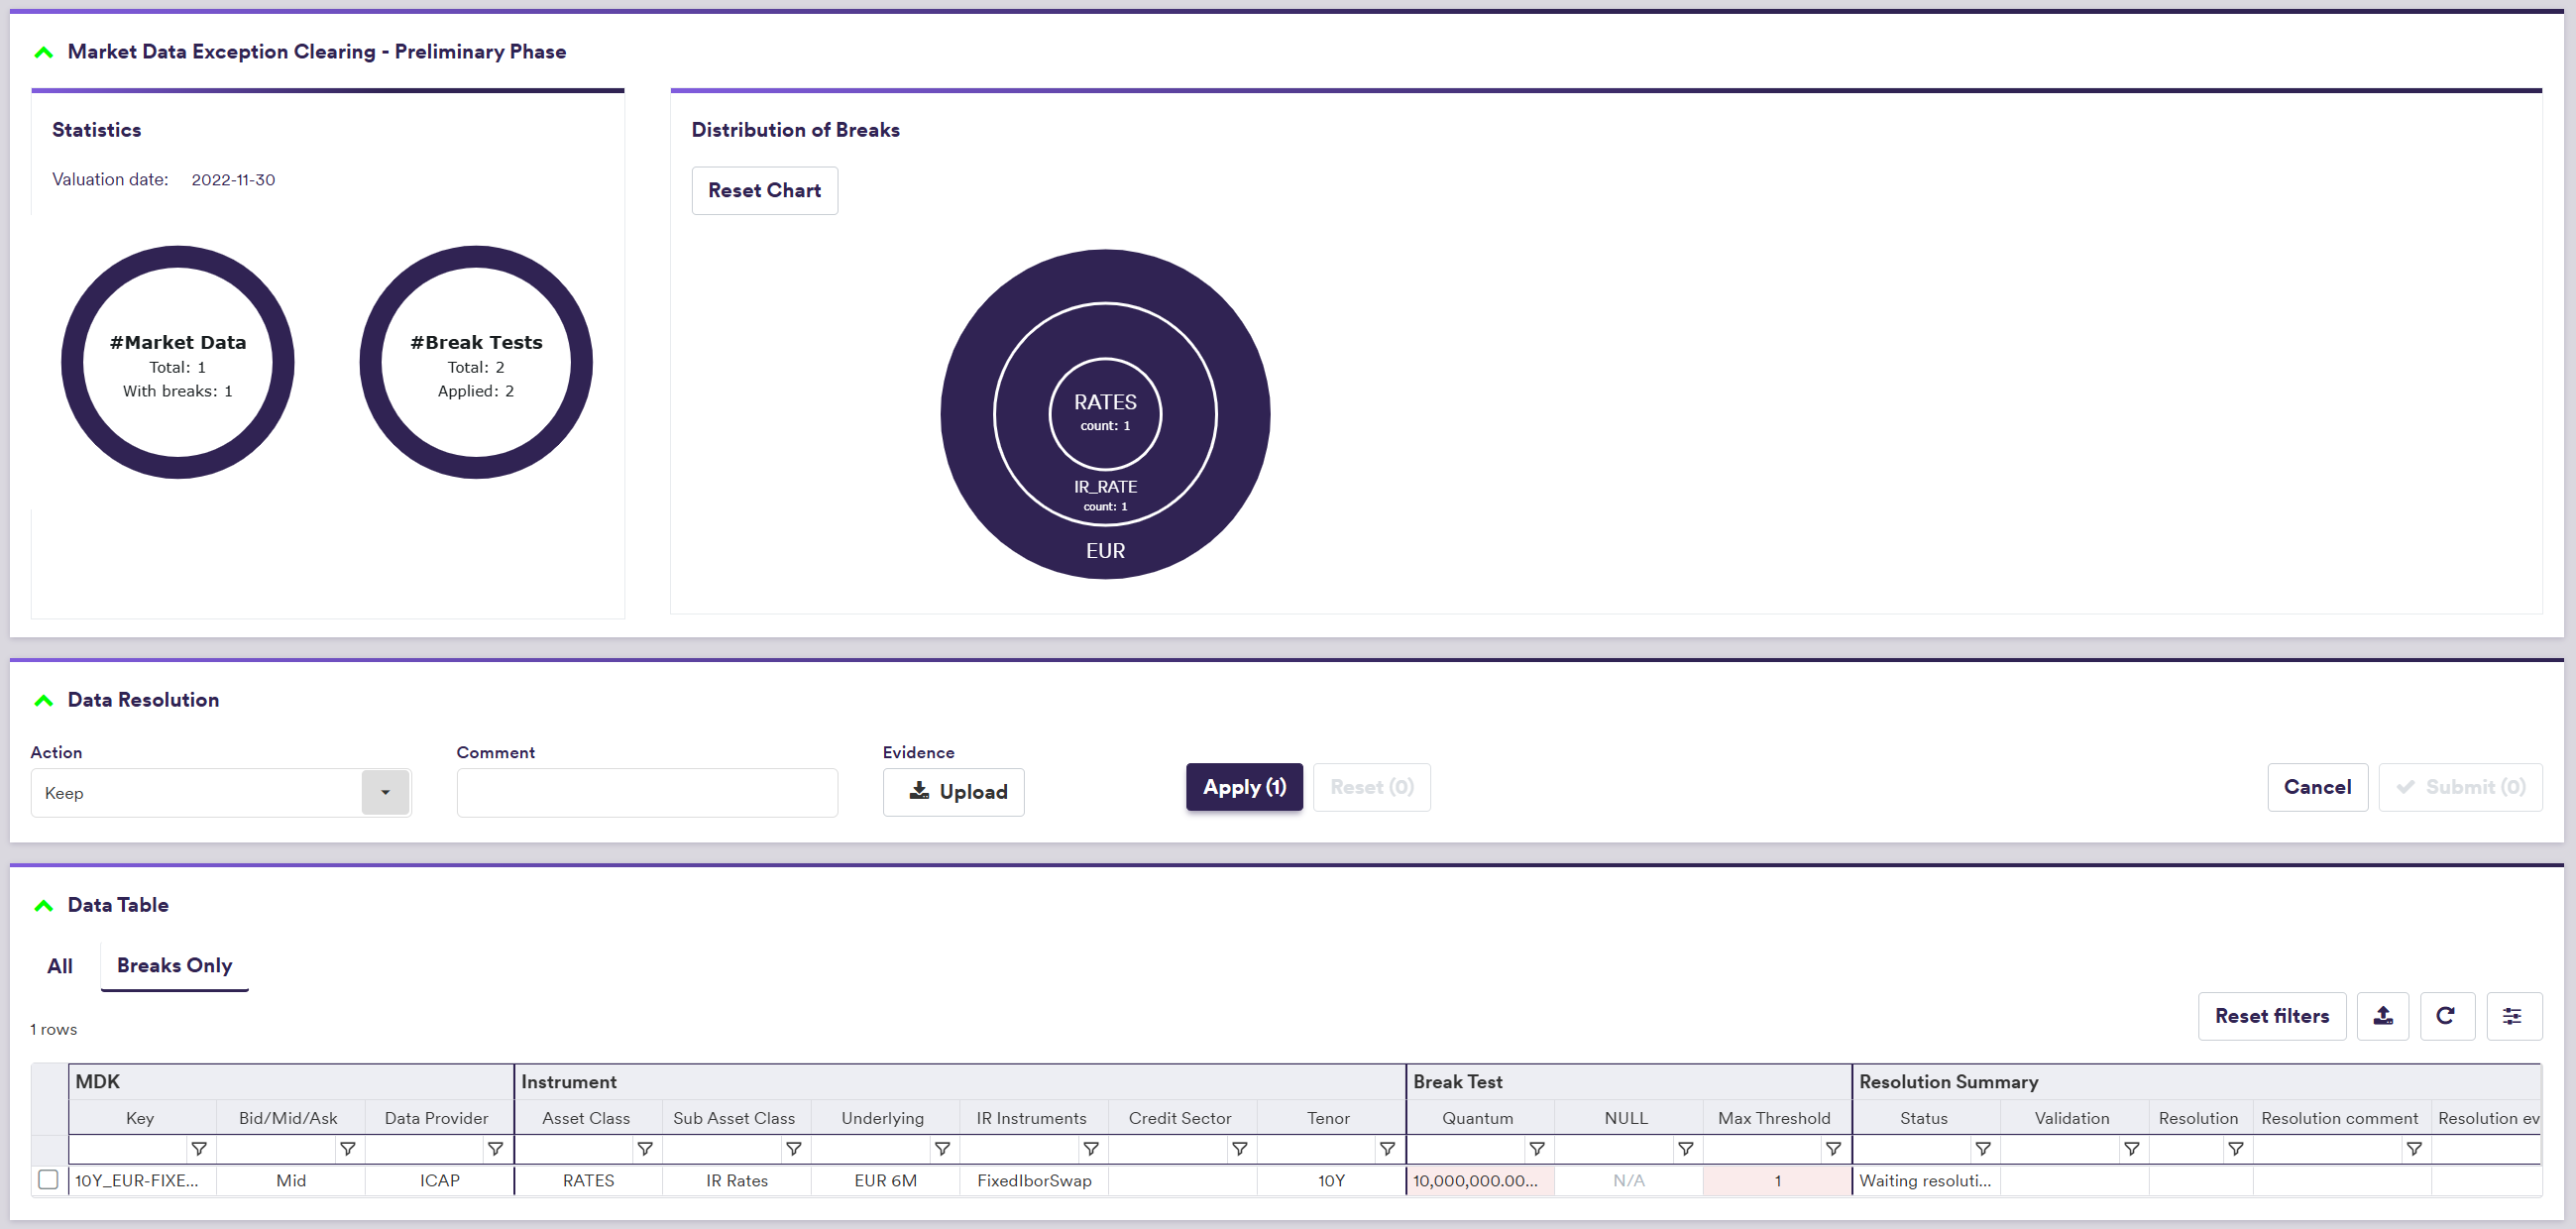
In addition to setting your preferred display configuration, you can:
- view all or only MDKs with breaks (by clicking on either ‘ALL’ or ‘BREAKS ONLY’ in the data table)
- filter and sort by Data Provider, Asset Class, Instrument Type, etc.
Supporting evidence can be uploaded prior to submission by clicking on
A description of prelimary resolution scope and actions and corresponding permissible values are set out in the table below.
You should note that unless the ‘Ignore NULL’ resolution action is selected (see table below), any other resolution action that attempt to set the value to NULL (or a value based upon NULL) will be automatically rejected upon submission. In addition, any break test (apart from the ‘NULL’ test) that involves a NULL value will not be performed and will be counted as a ‘Skipped’ test.
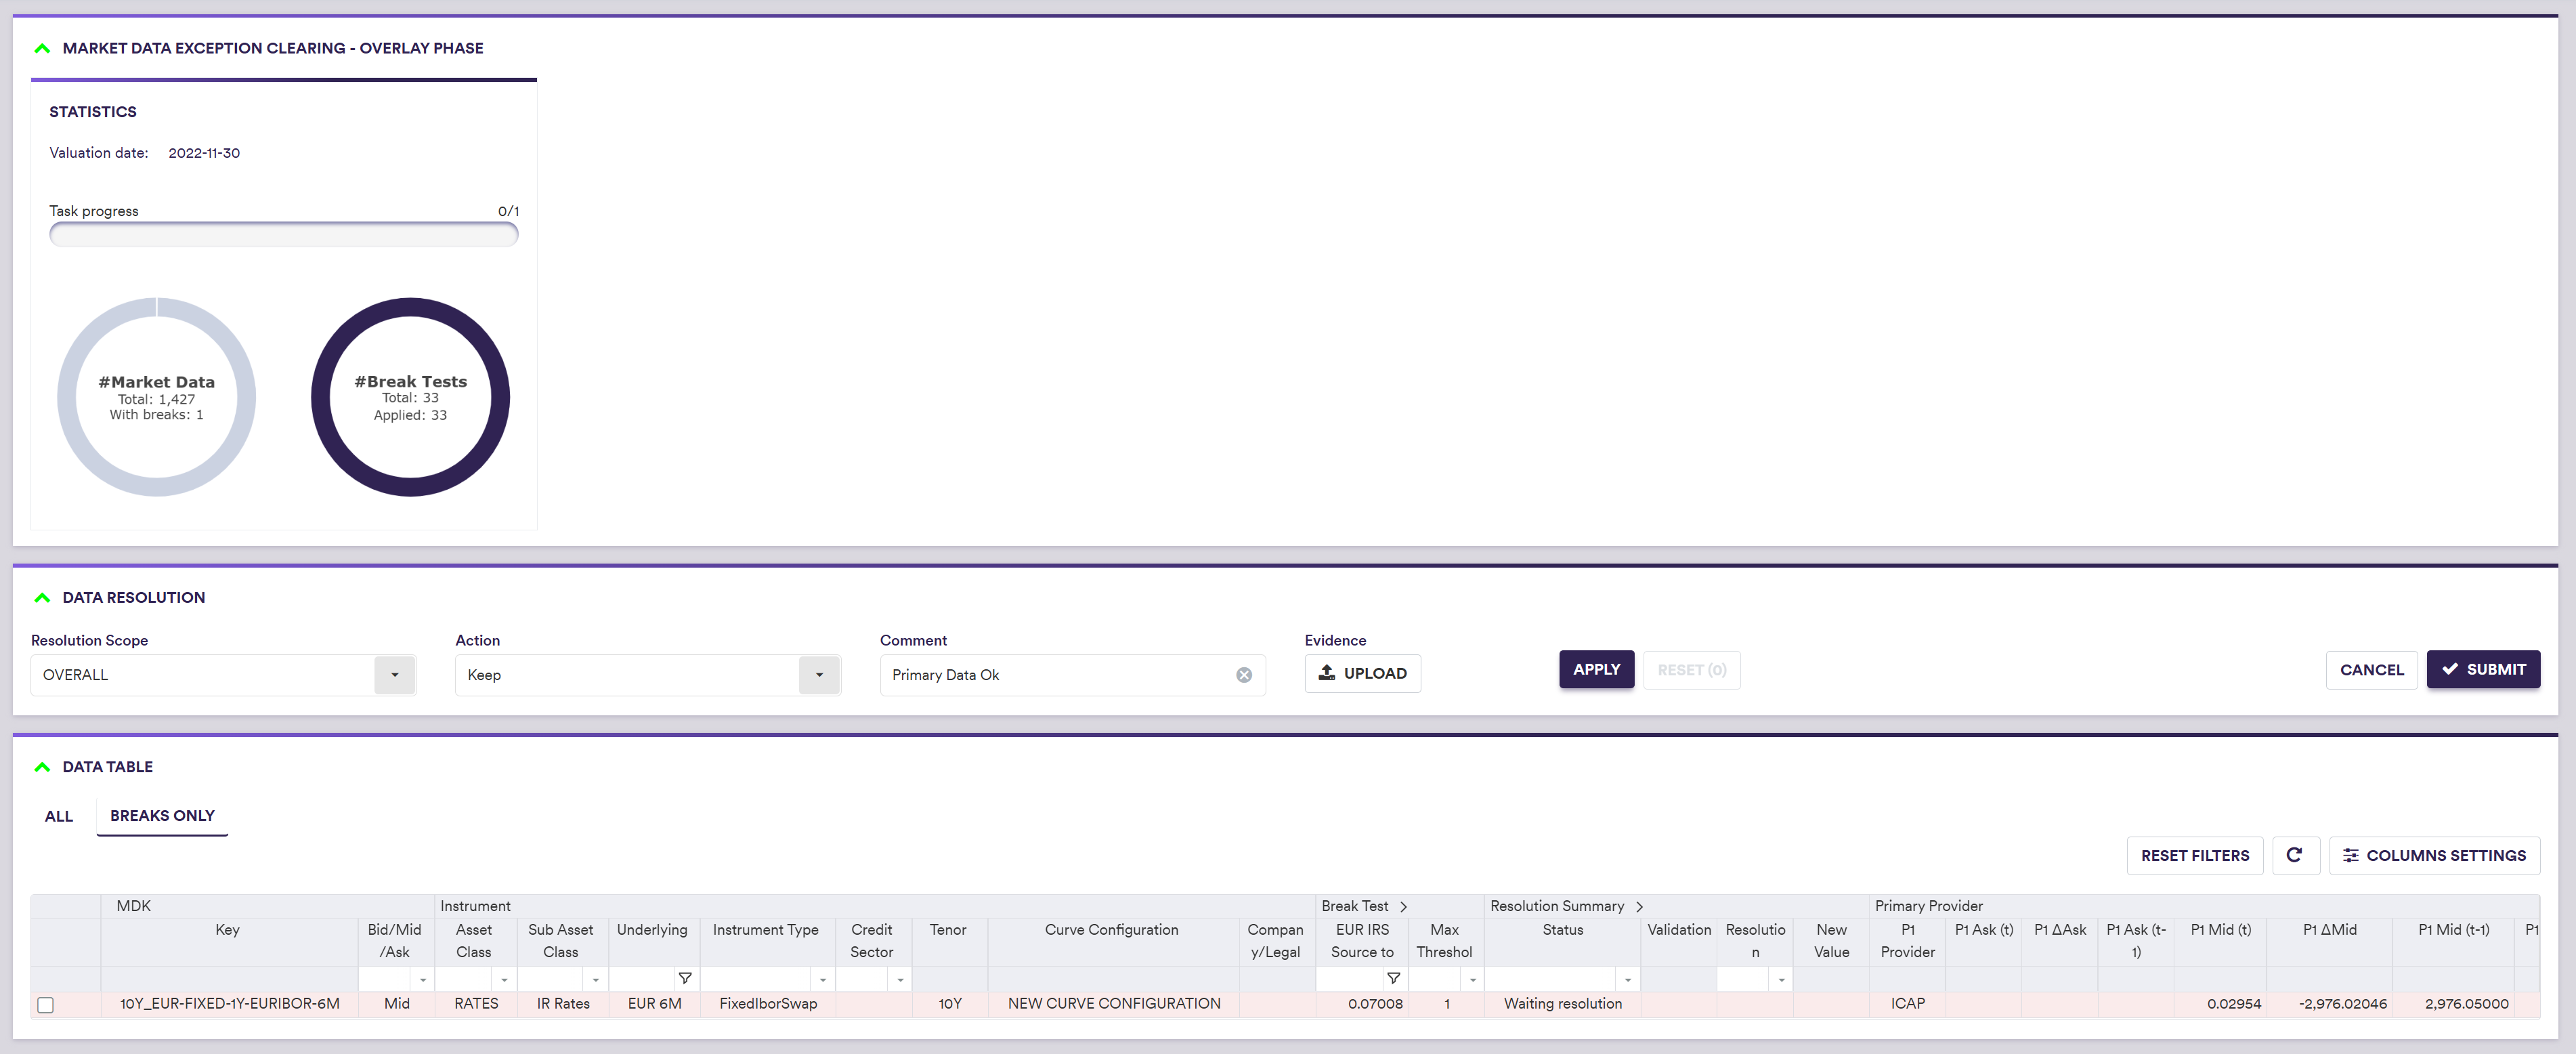
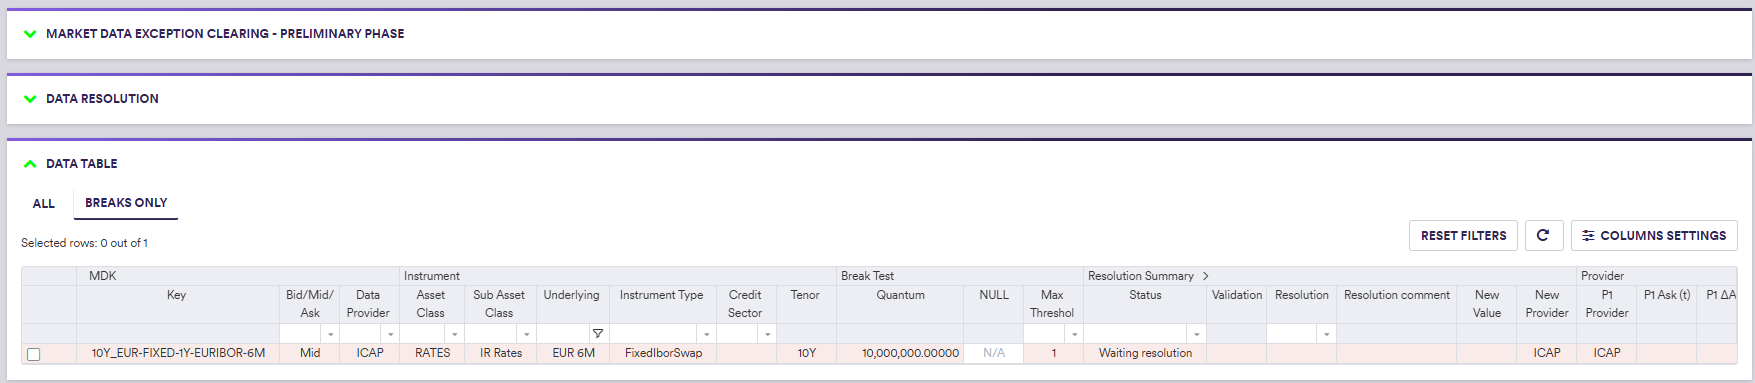
In this example, you can apply the ‘Manual’ resolution on an ‘INDIVIDUAL’ basis and input an override value of ‘0.02954’ for the break highlighted in blue, to correct the typo identified by the ‘QUANTUM’ break test in respect of the EUR 10y swap rate (vs. EURIBOR 6M).

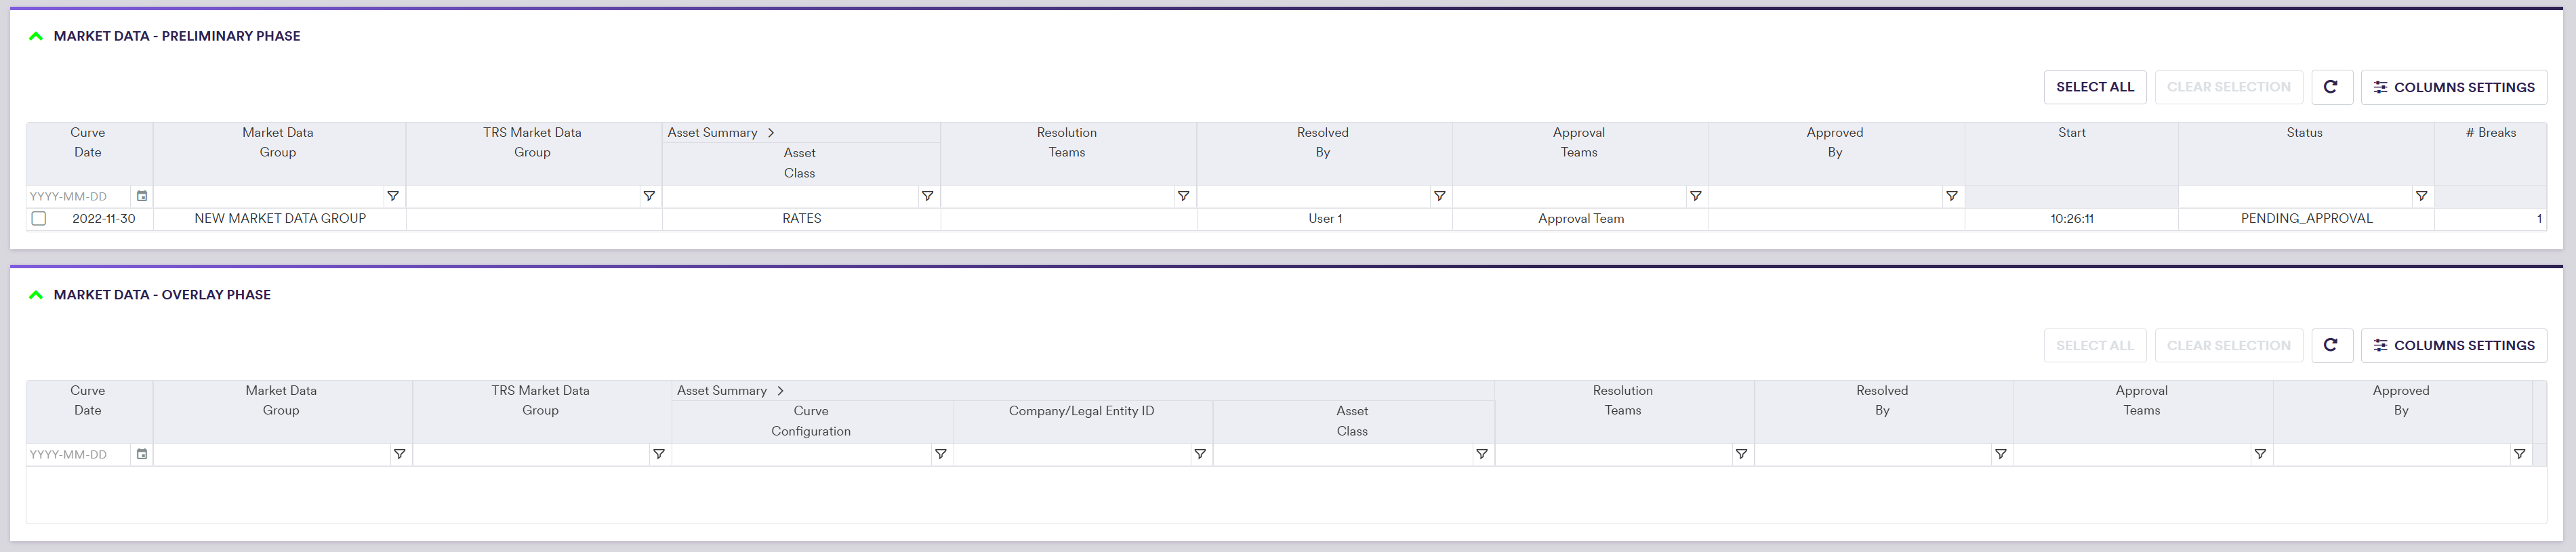
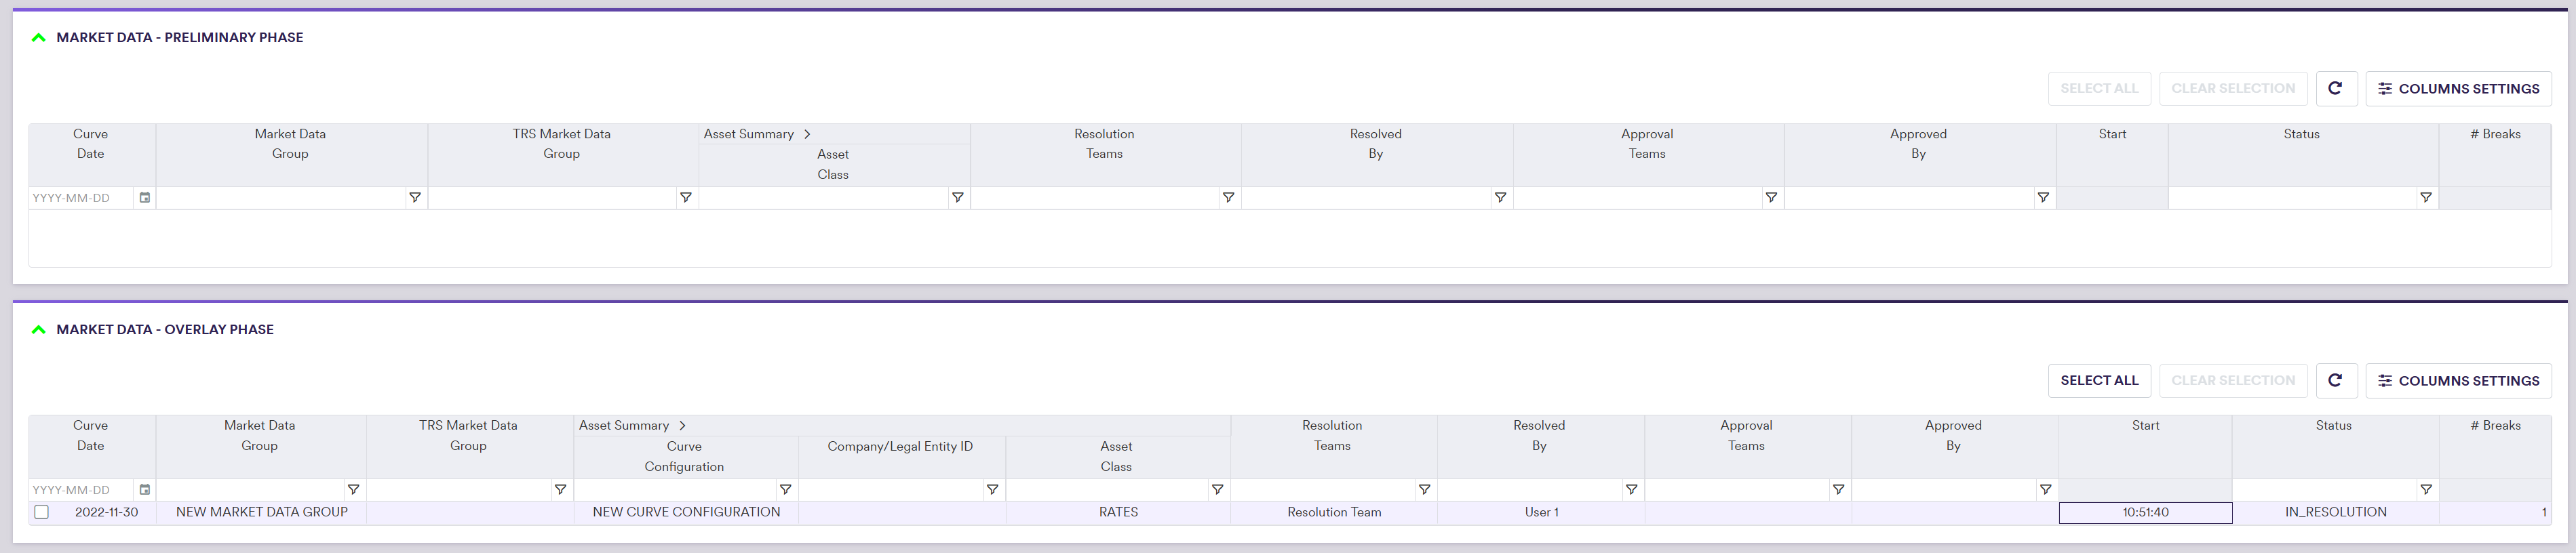
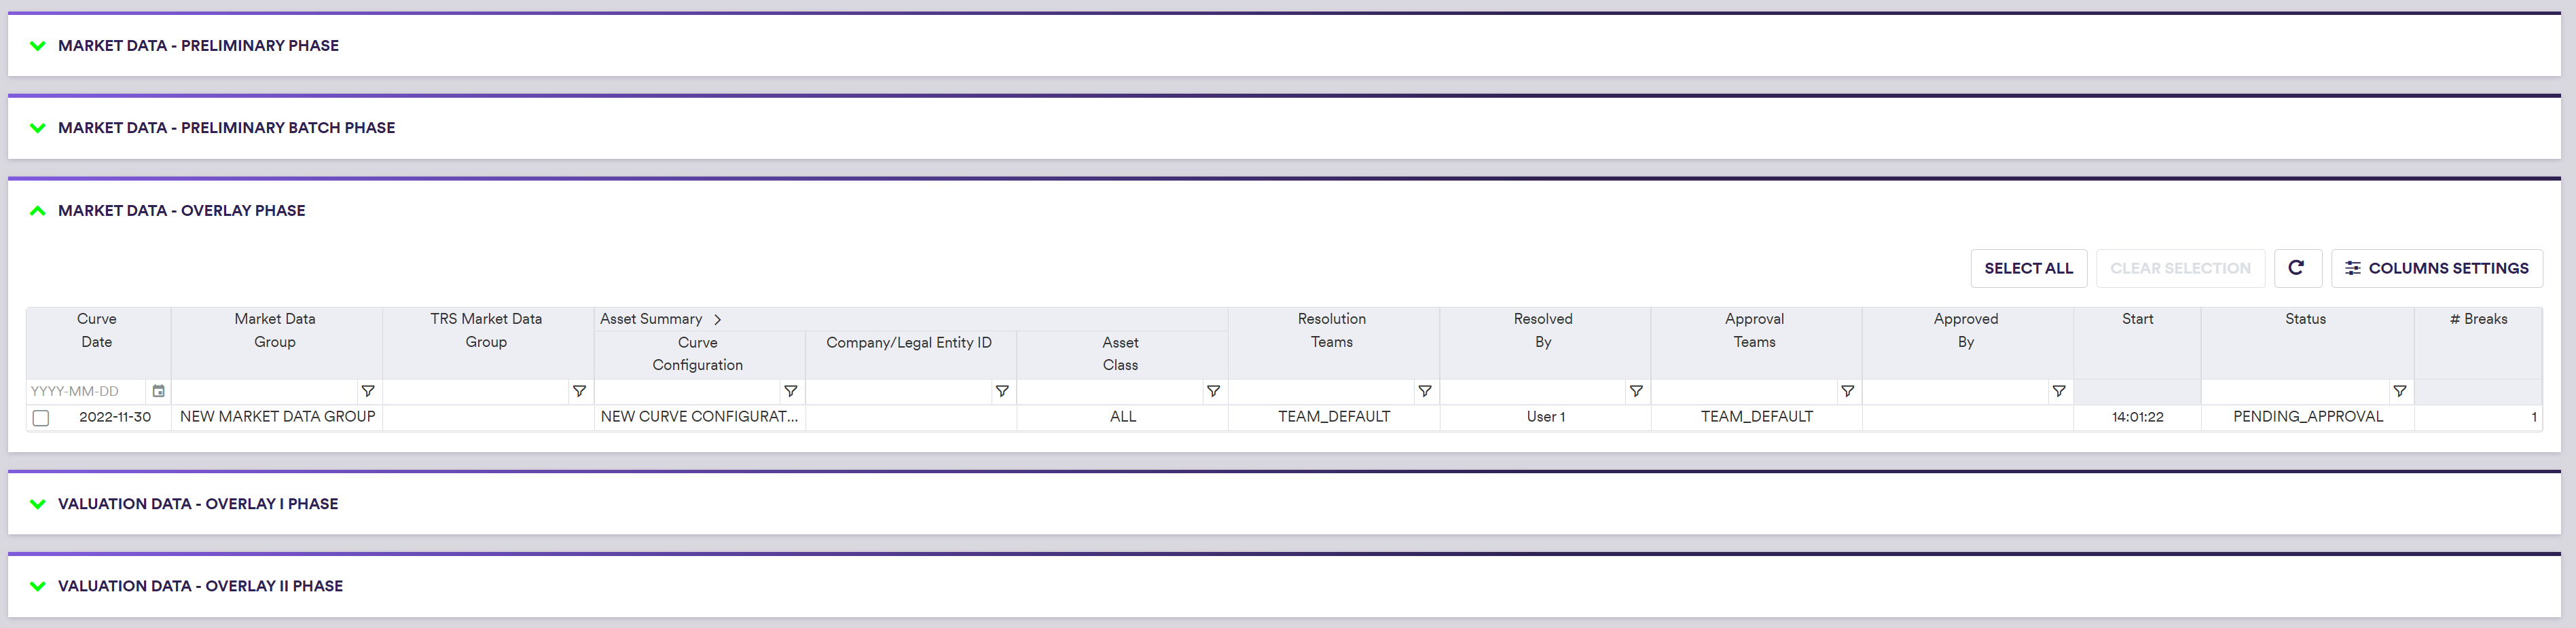
The task status will go from ‘IN_RESOLUTION’ to ‘PENDING_APPROVAL’ however, it will disappear from the live task list of the user who checked out and completed the resolution task initially, and will only re-appear in the live task list of another user who can be tasked with approving the proposed resolutions.
2. Market Data Overlay Breaks
In our example, following the approval of the preliminary market data break (Quantum test), you will resolve (with the ‘Keep’ action) and approve an overlay break (EUR IRS Source to Source test).
Under
To start the clearing process, check out a task by double-clicking on the line item or selecting a series of tasks and clicking on
The status of the selected clearing task(s) will go from “NOT_STARTED” to “IN_RESOLUTION”, and so forth until completed, when it (they) will disappear from the live task list.
In addition to setting your preferred display configuration, you can:
- view all or only MDKs with breaks (by clicking on either “ALL” or “BREAKS ONLY” in the Data Table)
- filter by Data Provider, Asset Class, Instrument Type, etc… by selecting an item(s) withing each column in the Data Table
Supporting evidence can be uploaded prior to submission by clicking on
A description of overlay break resolution scope and actions and corresponding permissible values are set out in the table below.
You should note that any resolution action that attempt to set the value to NULL (or a value based upon NULL) will be automatically rejected upon submission. In addition, any break test (apart from the ‘NULL’ test) that involves a NULL value will not be performed and will be counted as a ‘Skipped’ test.
In this example, you can apply the KEEP resolution on an OVERALL basis and submit.
The proposed break resolutions now need to be approved by a different user.
Bespoke Display Configuration
When viewing the market data break clearing tasks, you can:
- view all or only MDKs with break(s) (by clicking on either ‘ALL’ or ‘BREAKS ONLY’ in the data table)
- filter by Data Provider, Asset Class, Instrument Type, etc. within each column in the data table
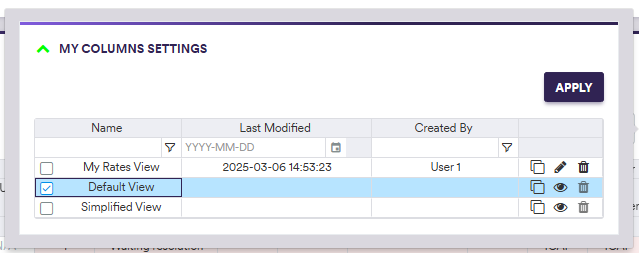
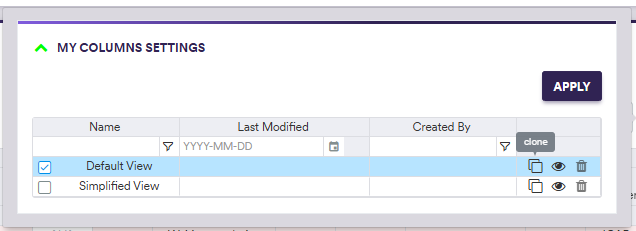
Xplain offers two pre-configured immutable views, which can be selected (or cloned and edited) after clicking on
- ‘Default View’
- ‘Simplified View’
In addition, you can define and save your preferred display configuration. This helps to clear out any extra noise and allows you to focus on the columns that are relevant to you. For example, if you specialise in anomaly detection for rates, the credit sector column will not be relevant to you, and you are able to remove it from your view. Any bespoke views can only be edited or deleted by their creator.
You will need to define your bespoke display configuration for the ‘Market Data - Preliminary Phase’ and ‘Market Data - Overlay Phase’ windows separately.
In the example below, you will go through configuring your own view, by cloning the ‘Default View’ and deselecting the ‘Credit Sector’ column.

After renaming the view: 'My Rates View' and deselecting 'Credit Sector'
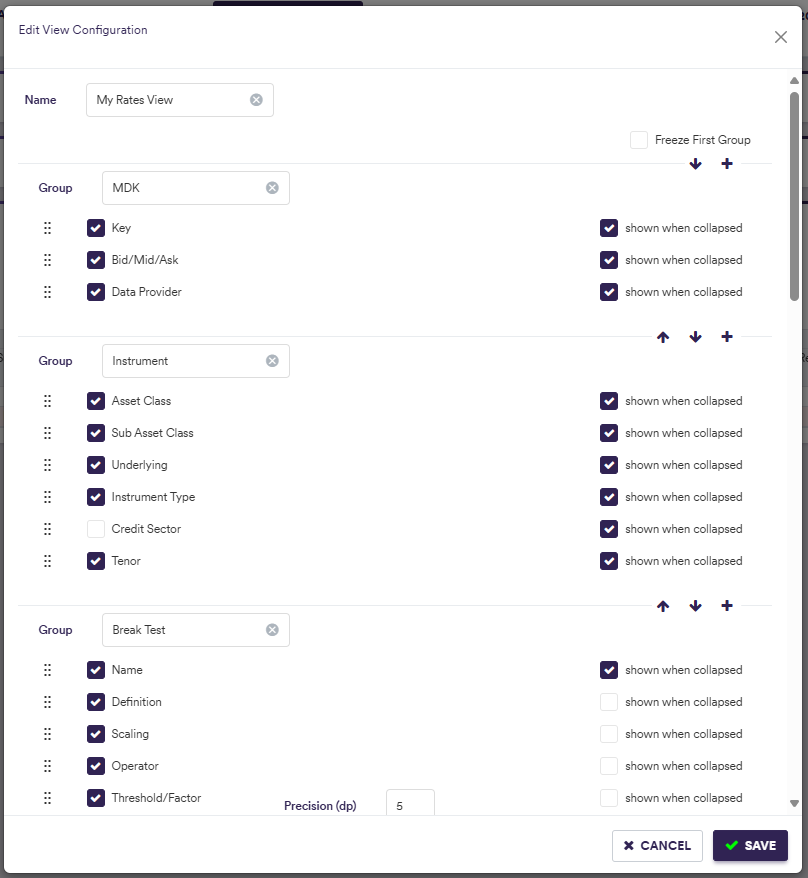

You can now select the ‘My Rates View’ display configuration (or any other display configuration) by clicking on